 |
| Minix NEO X5 |
A couple of weeks ago ,I've noticed that a NEO X5 tv was still left unbox in the other corner of my cabinet ,so I sat down with my stuffs in my workbench and had a harder time of cracking Minix Neo X5 to function in Linux -Ubuntu.As what was expected,I should published blog before another Internet TV box will be ported in Linux OS(seemed I was obligated-huh!). Well, this could be a matter of re-orienting my e-hobby as I am rushing time for an activity which is so important than doing this one(itanung nyo na lang kay Igorota).But still, I decided to get all the bunch of paraphernalia -and there you have it now,a new cracked Linux OS for TV Minix box .
Actually it's a sort of personal desire ,as I want to do the cracking entirely in Linux (pls. no windows) , and its hard to find a complete DIY of booting Minix box solely in the said platform .So I started looking for a rkflashtool (Rockchip Flasher tools and firmware) that could be flashed into its NAND memory of Minix NEO X5 .As usual,the technique is to modify the code by first finding usb ID address referring to the dual-core RK3066(this time the NEO X5) ,then changing the line parameter of rkflashtool.c is required .Additional info is the filesystem used to have the Minix boot to both ubuntu and customized Picuntu .
Actually it's a sort of personal desire ,as I want to do the cracking entirely in Linux (pls. no windows) , and its hard to find a complete DIY of booting Minix box solely in the said platform .So I started looking for a rkflashtool (Rockchip Flasher tools and firmware) that could be flashed into its NAND memory of Minix NEO X5 .As usual,the technique is to modify the code by first finding usb ID address referring to the dual-core RK3066(this time the NEO X5) ,then changing the line parameter of rkflashtool.c is required .Additional info is the filesystem used to have the Minix boot to both ubuntu and customized Picuntu .
This scratch article will discuss the boot process used on the Minix Neo x5, and some formats/contents of each NAND (aka ROM) partition.In this way,we can understand or manipulate the configuration of its build. Other geeks have a make up new 'rom's for the systems and produced these '.img's (recovery), and the documentation is here for those who want to get in on the cracking.
From the RK3066 Tech Ref Manual , the RK chip has a boot ROM and some default operations to look for suitable boot partitions on NAND and SDcard devices to power up things. Also, the boot code able to load the kernel and some root filesystem to start running OS. The system, cache, userdata and user are normal linux filesystems which can be done by mounting them in the SD card, boot is a compressed bootloader code, kernel is the binary executable loaded and executed, recovery for an option of dual OS loading (Ubuntu/Android)
Again, I would like to thanks the following geeks on the Cyber Web : view wizard,jps,olegk0,AndrewDB,Elona Dika and others for their contributions of booting NEO X5 in linux.This scratch article aims to share anyone the procedures ,source code, or a replacement build for
the NAND partition images.
..............................enjoy the box build! -E^3
..............................enjoy the box build! -E^3
Requirements:
Hardware:
Minix NEO X5
PC running in Linux
OTG USB cable
Software:
Linux OS installed in your computer
rkflashtool
https://github.com/linuxerwang/rkflashkit
Ubuntu OS for the Minix NEO X5
https://googledrive.com/host/0BztHRbE8mM49TDc3WW1wMERUUkk/Ubuntu12.10_armhf_MINIXx5_CLEAN_ver0.1.tgz
Picuntu OS for the Minix NEO X5
http://cdn02.arctablet.com/mirrors/picuntu_home-io/
recovery image
https://googledrive.com/host/0BztHRbE8mM49TDc3WW1wMERUUkk/recovery.img
Objectives:
To install and boot linux(Ubuntu) in a Minix NEO X5
To enhance linux application using Minix NEO X5
To use Minix NEO X5 in a lowcost embedded computing projects
Methodology:
Step1: Flashing the firmware of Minix NEO X5
1) Find the necessary tools for flashing firmware image in the SD card
root@locahost# wget
https://github.com/justgr/arnova-tools/blob/master/rkflashtool/rkflashtool.c2) Install the required USB software libraries in Linux OS
root@localhost# sudo apt-get install libssl-dev libcrypto++-dev
3) Press down the recovery(reset) button using a paper clip or pin that can eject/push switch inside the tiny hole.
4) Power up the RK3066 device from only the OTG port using a standard usb cable
Note:
(special OTG cable required or shorting of the sense pins)
Please plugged the OTG-USB cable into your PC (running linux.)
5) After 5 seconds release the button; at this point check USB properties.
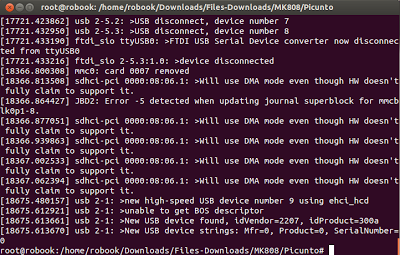
Run dmesg as you should see something liked detail 1
root@localhost# dmesg
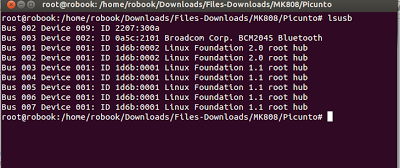
6) Run lsusb and make note of the device id
root@localhost# lsusb
My Minix NEO X5 vendor ID is 2207:300a
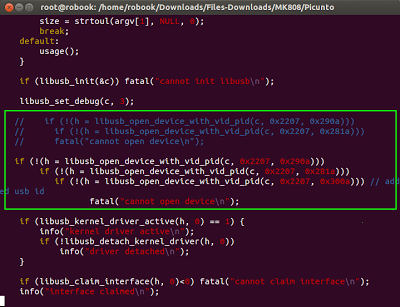
7)A vendor ID should be inserted in rkflashtool.c as liked in detail 2
root@localhost# tar -zxvf rkflashtool.tar.gz
root@localhost# cd rkflashtool/
root@localhost# vim rkflashtool.c
8)Let's compile the rkflashtool.c using gcc
root@localhost#gcc -o rkflashtool rkflashtool.c -lusb-1.0 -O2 -W -Wall -s
Note:
We're now ready to read the flash(a moment of truth :) ).
As a first step you may dumped the entire 8GB NAND flash as a backup like so
9)To backup the whole NAND-it will take sometime.
root@locahost rkflashtool r 0x00000000 0x01000000 > myflashbackup.bin
To quickly get an idea of where everything is in the flash you can run CLI command below . It will reveal the parameters which include the offsets for all images in NAND including boot, system and user.
root@localhost# hexdump -C myflashbackup.bin | more
10) To grab the kernel do the following:
root@localhost# rkflashtool r 0x00004000 0x00004000 < minixkernel.img
11) To upload a new kernel do the following:
root@localhost# rkflashtool e 0x00004000 0x00004000
root@localhost# rkflashtool w 0x00004000 0x00004000 < recovery.img
root@localhost# rkflashtool b
12) To have a dual booting with Android or Linux
root@localhost# rkflashtool w 0x10000 0x8000 < recovery.img
root@localhost# rkflashtool b
Step2:Partitioning the SD Card
Partitioning your SD Card
root@localhost# sudo apt-get install gparted*
root@localhost# gparted
1) Create an "ext4" partition
2) resize the partition atleast 5GB or larger
3) label it with "linuxroot"
4) Downloaded and untar file from the site
root@localhost# tar xvzf /PATH/ubuntu/picuntu.tgz -C /media/linuxroot/
Step3:Installations and booting
1) For wired network
root@localhost# nano /etc/network/interfaces
2) For wireless uncomment wireless network ,and in wpa-ssid put the name of your network and pasw
root@localhost# passwd dfasdf
root@localhost# iwconfig
root@localhost# reboot
3) Install Xubuntu interfaceroot@localhost# sudo apt-get update
root@localhost# sudo apt-get install xubuntu-desktop
4) Install Gnome interface
root@locahost# sudo apt-get install gnome
5) Creating X11 folder
root@localhost# sudo mkdir /media/linuxroot/etc/X11/xorg.conf.d/
root@localhost# cp -r /PATH_TO_FILE/exynos5.conf
/media/linuxroot/etc/X11/xorrg.conf.d/
6) Get the exynos5.conf file
root@localhost# wget https://www.dropbox.com/s/locvo5eotzxjg13/exynos5.conf
7.Start Minix and enjoy the interface
a) Ubuntu
username: ubuntu /password: ubuntu
username: root/password: 1234
b) Picuntu
username: root / password: 12qwaszx
username: picuntu /password: 12qwaszx
MySQL username: root /password: 12qwaszx
Details:
Details(1)Please run the lsusb command
Details(2)After finding the vendors ID ,copy the highlighted code in the rkflashtool.c
Details(3)Next run the dmesg command to find vendors ID
Details(4) Linux logo indicates kernel proper loading
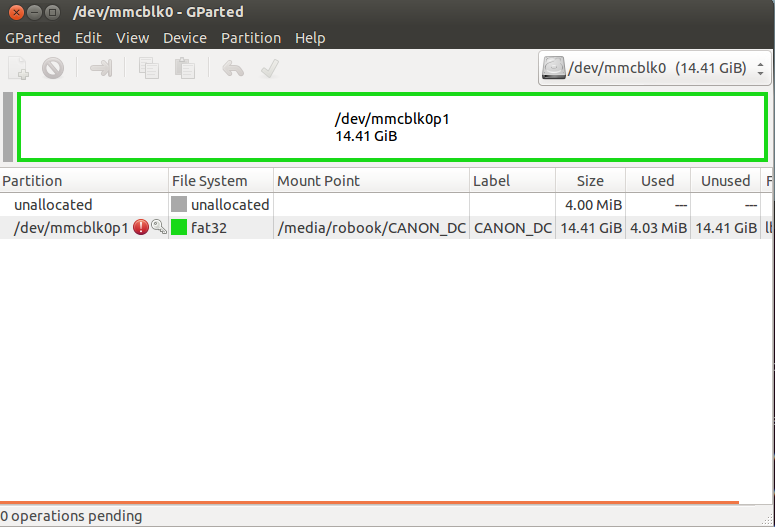
Details(5) Partitioning SD Card using gparted command
Details(6)CPU processing
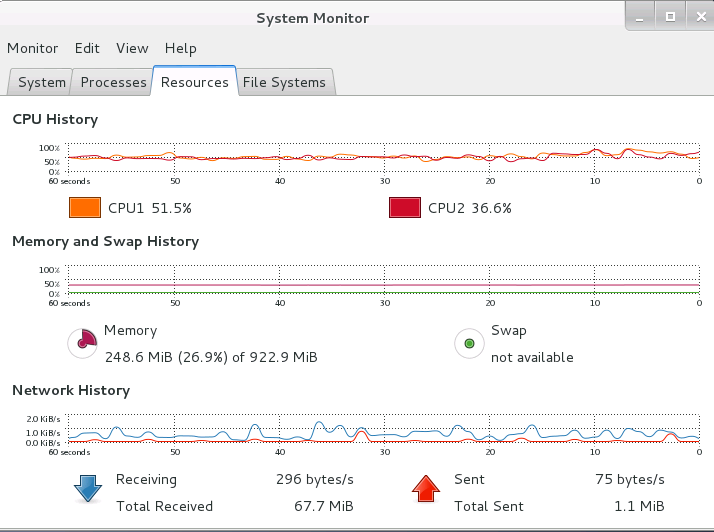
Details(7)Completing the package installation

Details(8)Setting proxy

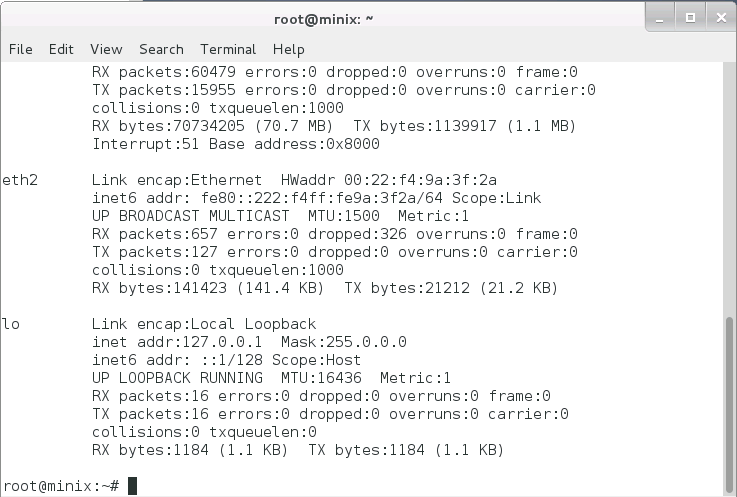
Details(9) IP address configuration (Wired /Wireless)
Details(10)Minix NEO X5 Desktop (Gnome)

Details(11) Running application in the box

Summary:
1) Need to enhance 2D/3D graphics accelerations
Conclusions:
This concludes that booting and running Linux in Minix NEO X5 equals computing performance of a traditional PC but differs in power consumptions .Another is the flexibility and robustness of the box yet with an affordable price as compared to any thin clients or single board PC .


Please advise how and where we can buy and avail of this hardware. Thanks and more power to your blog :)
ReplyDeleteHi Brother,
DeleteYou can buy Minix TV box , in Green Hills Sta. Mesa or in Villman Store
Thanks
E^3
Microcontroller Embedded Design: Minix Neo X5 Booting In Linux(Ubuntu) >>>>> Download Now
Delete>>>>> Download Full
Microcontroller Embedded Design: Minix Neo X5 Booting In Linux(Ubuntu) >>>>> Download LINK
>>>>> Download Now
Microcontroller Embedded Design: Minix Neo X5 Booting In Linux(Ubuntu) >>>>> Download Full
>>>>> Download LINK 5v
Hello and thanks for the great work.
ReplyDeleteAlthough you did a great job, there are several mistakes in your post that made me (and possibly other readers) spend lot's of time to figure out. Here are the corrections that I remember to help other readers:
Step 1: 1) wget https://github.com/justgr/arnova-tools/blob/master/rkflashtool/rkflashtool.c gets a html version of the file that cannot be compiled. One has to follow the link from a browser and copy paste the code to a text file manually.
2) the libusb-1.0 is also needed so the command should be:
sudo apt-get install libssl-dev libcrypto++-dev libusb-1.0-0-dev
4) “Power up the RK3066 device from only the OTG port using a standard usb cable” sounds a bit like you don't need the power plug to be plugged which of course is not true. Power is needed :) Also in my case the OTG cable provided with the minix and a male to male usb cable did not work. Instead I used a usb / OTG cable from an android mobile of mine (just the charging cable) from which I trimmed off some plastic (http://www.youtube.com/watch?v=ZIZxFRe8bfg)
5) the led still goes on even when in recover mode, also dmesg is not really needed. The info is given by lsusb in the next step
7) tar -zxvf rkflashtool.tar.gzroot@localhost# cd rkflashtool/ is not needed as you get the rkflashtool.c in step 1, also in order to edit rkflashtool.c gedit (graphical interface) makes more sense than vim (that's personal choice :) ).
8) you don't cut (no paste btw) all the lines. Instead you remove from the highlighted part the lines that do not correspond to your device (keep the one that matches)
Now in step 2 (partitioning the sd card) is where I got stuck and can't figure out how to continue. My linux pc mounts the sd card with mtp and gparted can't see it no matter what I do. Any ideas how to make gparted recognise the sd card?? I guess I have to mount it without mtp – but with what?
Thanks a lot in advance
Hi bro..
DeleteGood Day
.. nice comments, ive edited some typos already yet you may read te changes and its there for you to do it (forget the MK808 :) )
Somehow you are getting the method well, just checked the detail 5 for the gparted screenshot.Partitioning the SD card in gparted is very easy:
1) You should see the upper right corner of its gui to see the list of drive available -fortunately the SD card.
2) format it with "ext4" , label it with "linuxroot" and make it a "Primary " partition
3) Untar the Ubuntu/ picuntu package (you should be in a root mode)
4) Copy it in the sdcard RFS directory "linuxroot"
Observe:
1) During boot up you see the two penguin icon in the display-this means your flashing the image is correct
2) A debian desktop shoul appear next and dont forget the password
-hope this helps...
Thanks
E^3
Hello Sir Naser,
ReplyDeleteGood Day.
I did not explore yet the XBMC .
I have already a good working graphics as 32 bit color depth.I first copy the exynos5.conf in the /media/linuxroot/etc/X11/xorrg.conf.d/ then
I installed every gnome libraries like apt-get install gnome* and there it installed some of the graphic files necessary for the videos and graphics.And it is working fine now
-E^3
Hi Sir Naser,
ReplyDeleteYes,hope you could share some tips
Thanks
-E^3
Thanks for this post, that's exactly what I was looking for!! I can't wait to try that myself...
ReplyDeleteI will report the troubles I will have here (if any).
Hi emeakyl,
DeleteWell thats fine , sure!
Thanks
E^3
Thank you for this. I hope someone spends some time and does this for Neo X5 mini version.
ReplyDeleteHi Sir ,
DeleteGood Day.
All the guides/instructions are the same , its only that OTG port is the USB port now.
Thanks
-E^3
Hi !
ReplyDeleteThank you for this !
Does the minix-remote work on linux?
thanks
Hi Sir Julien,
ReplyDeleteOkay, we'll try to do that :)
E^3
Hi E^3,
ReplyDeleteI have try to install ubuntu and i have this error on boot: "eth0 no PHY found"
I have a minix x5 neo MINI...
have an idea?
thanks
Hi Sir Julien,
ReplyDelete1) Try to follow this step especially 5-7
Step3:Installations and booting
2) You may try to check the /etc/network in your SD card file
3) You may try this link
http://minixforums.com/threads/linux-on-minix-x5.1388/page-16#post-23037
Thanks and please share the results ;)
E^3
i am stuck on 2 penguins.... what am i doing wrong?
ReplyDeleteHello brother,
Delete1) Download this file
Ubuntu OS for the Minix NEO X5
https://googledrive.com/host/0BztHRbE8mM49TDc3WW1wMERUUkk/Ubuntu12.10_armhf_MINIXx5_CLEAN_ver0.1.tgz
2) Please read step #2 Partitioning the SD card and so on...
Thanks
-E^3
Philippines
Hello again my friend. I am stuck at initramfs now....
DeleteOh I got it working. Just flashed your recovery image, instead of latest from viewwizard
DeleteHello Алексей Быков,
DeleteWow that is good for you!
Cheers!
-E^3
So hello again I am back in business)) I got two penguins only after apt-get upgrade. I assume it is one of the packages that could not be apdated. I reflashed recovery, made sdcard again and system back working. So maybe I should blacklist updating of some packages? Which one?
Deletehi Алексей Быков,
DeleteGood Day.
Your recovery image is good , the error is in the sd card and its files , because if you upgrade it will have some conflict with the other files and eventually will cause an error/s.
So, my advise is that you keep the recovery image and its corresponding rfs as is, and try observing some of the conflict in its upgrade..
Thanks
-E^3
Philippines
i think there was a problem with my sdcard.... system was randomly freezing after 2 penguins - just black screen..... i switched to usb flash drive and everything went good... as it is good for now.
DeleteHi Sir Алексей Быков,
DeleteWow thanks another trouble-shooting issue :)
-E^3
wich xmbc version should works on this linux?
ReplyDeleteHi Sir ,
ReplyDeleteI forgot the xbmc version of this one, but you can have a try using this tutorial
with your new Minix NEO X5 ..adn will see through it .
Thanks
-E^3
(and here are my notes on step 2 and 3)
ReplyDelete- Used 'sudo apt-get install gparted' to install gparted on PC instead of yum.
- Put the SD card in the SD slot of the PC showed the SD card in the launcher of the PC. Run gparted as sudo next.
- Selecting the SD card through the combo box in the right top hand corner (in my case referred to as '/dev/mmcblk0 (7.46GiB)' will show the partitions on it in the area with the blue border, and textual below that. Instead of using the menu I used the popup menu that appears when right-clicking the blue bordered area. After selecting Format to / ext4 I had to click the green V in the toolbar to actually have the format operation executed. The same goes for setting the label to linuxroot. It was a bit unclear whether the created partition was a primary partition, but given that it ended with p1 and knowing that p1 though p4 are considered primary partitions I assumed it was indeed a primary partition.
- After closing gparted and unmounting and unlocking the SD card from the launcher, I had to unpack the distro with step 2.4). But in my case the destination wasn't /media/linuxroot but /media/marc/linuxroot, marc being my user name.
(This concludes step 2)
- I executed step 3. on the Minix so I ejected the SD card, and after shutting down the Minix placed it in the SD card slot of the Minix, and turned the Minix on. Two penguins appeared in the left top corner of the computer monitor. After quite a while the Ubuntu 12.10 login notice appeared on the monitor. I logged in with ubuntu as login name, and also as password (so with an u at the end and NOT an o).
- In order to be able to download stuff, I needed to get the wifi up and running. To this purpose one needs to edit the contents of the /etc/network/interfaces file. Before doing so I used iwconfig to view a list of network interfaces, the last one being eth2, which apparently was the WiFi card. Executing ipaddr will give you a list of settings. I commented out the lines referencing eth0 in /etc/network/interfaces, and changed the references to eth1 to eth2, and put the name of my WiFi router behind wpa-ssid (enclosed in double quotes because its name contains blanks) and the router's password behind wpa-psk. After saving, I rebooted with sudo reboot now, and once it had restarted I had WiFi up and running.I knew because I could see a valid local IP-address in the output on eth2 of the command ip addr (behind the word inet).
- Next I executed sudo apt-get update to check for updates (step 3.3). No problems there.
- Next I installed gnome (step 3.4). This took a couple of hours, first for downloading the compressed files, than for unpacking them, finally for setting them up.
- Finally I had to execute step 3.5. I cd'd to the given folder /media/linuxroot/etc/X11 which was already there. I created the xorg.conf.d directory and cd'd into it. Then there's no need to execute the second (cp) command, only the wget command to download the exynos5.conf file.
- After this, I rebooted, and the gnome login screen appeared. I logged in as ubuntu first, but got an error saying 'Could not update ICEauthorityfile /home/ubuntu/.ICEauthority', so I decided to log in as root. Doing so did not give that error.
- After logging in as root, I configured the WiFi (but still not sure whether I needed to do that because I already had WiFi up and running), added myself to be another user, set to be automatically logged in, and changed the password of it in a terminal window with the passwd command i.e. passwd followed by the name of the user of which you want to change the password (remember I am logged in as root so allowed to do so!). I installed firefox with 'sudo apt-get install firefox'.
- The text graphics on the screen are not very clear. I downloaded gnome-tweak-tool to change some of the text rendering settings.
- I also tried to upgrade to Ubuntu 13.10 and run the Unity desktop (which my 14.04 is running) but this failed miserably, so I had to repeat step 2 and 3. Perhaps because there's only 1G RAM?
Hi Sir Marc,
DeleteThanks for seeing those typo errors-i've changed it already upon notice.
Presumably,because its 1 GB ram.
Anyway you can try some other desktop GUI ,such as mate,KDE or etc. In my case I've just tried what is in the tutorial and it worked well. If you have some tips please let me know and I will add it here.
Again,thanks for sharing...
Cheers!
E'3
Philippines
Hi again,
DeleteForgot to mention mouse and keyboard under hardware but that goes without saying.
I would be interested in communicating with serial port devices connected through USB. Would I need a driver for that, and if so, which one (if it exists)?
Marc
Hi Marc,
DeleteGood Evening!
Yes, you can use USB to Serial hardware (FTDI,Cypress and etc), or just simply check if it is detected.Otherwise you need to look and install its corresponding driver/s.
ttyUSB* this is to show if USB to serial hardware is available ,then use minicom to test it..
Cheers!
-E^3
Hi,
DeleteI installed XBMC but it wouldn' t run saying that I would need 32-bit color depth. I changed the depth settings in exynos5.conf to 32 but then X wouldn't run (I am using gnome desktop environment). Do you know how to remedy this and make XBMC run?
Thanks in advance, Marc
Hi Marc,
DeleteI think you miss drivers installed and other sorf of libraries.
http://wiki.xbmc.org/index.php?title=Archive:HOW-TO:Install_XBMC_on_Ubuntu/HOW-TO_3
You can try this tutorials to do so...
Please share us your success.
Thanks & Cheers!
-E^3
there is a pretty good port of xbmc under android which runs quite well on stock minix neo x5. why try it on linux?
DeleteHi Sir Алексей Быков,
DeleteGood day.
Well, that perhaps a good point :)
But it is worth a try .
Cheers!
E^3
Hundred dollar thin client. Awesome!
ReplyDeleteyes Chinook,
ReplyDeleteIts awesome!
-E^3
Any video on Youtube to see it working ?
ReplyDeleteHi Sir,
DeleteGood day, my apology there is no video of this , because the tutorials is comprehensive and self explanatory. You can try this link for a proof :)
http://askubuntu.com/questions/392845/ubuntu-installation-on-minix-neo-x5
Thanks
-E^3
Hi E^3, everyone,
ReplyDeleteThanks for this great guide, it got me further than all the others I have tried.
Never the less, I am stuck without a connection.
I have the Minix X5 Mini.
Everything has gone smoothly up to the point where I log in to Ubuntu root and try apt-get update. I realize then I have no internet connection.
I am only interested in setting up a wired connection but, regardless, iwconfig didn't show any wireless adapters. I only seem to have eth0 available but it will not take any address.
/etc/network/interfaces seems to be correctly setup to eth0 and auto DHCP...
So I really don´t know what to try.
I get the feeling the hardwares for the X5 and the X5 mini are different enough for this not to work.
Anyone able to help?
Thanks again.
Javier
Hi Javier,
DeleteGood Day.
Actually, I did not try that Minix NEO X5 Mini, but that is the hardware problem if I am not mistaken,
You can try knowing it ,
1) type in the CLI ( or any ipconfig command)
root@localhost# lshw -class network
2) If you Find it ex: broadcom,RTlink etc
3) Download the driver in their site (with ARM support)
4) Install it or compile --- just follow this link ...
http://askubuntu.com/questions/113794/how-do-i-install-the-ethernet-drivers-in-ubuntu-10-04
Hope this helps..
Please join this blog and share with us your results
Thanks
-E^3
Hi again,
DeleteI couldn't find any commands to find out details on the Ethernet adapter but I did some digging and found out the Ethernet is a "SMSC LAN8720A" but I can't find any ARM drivers for Linux.
I got the info from this site:
false.ekta.is/2014/07/minix-neo-x5-mini-teardown-and-serial-console
Do you have any idea where I could get the drivers?
Thanks.
Hi Javier,
DeleteHmmmn, Ok , that is the Ehternet LAN made by Microchip not the RealTek which has a common driver in Linux.
Anyway,I found this source code so far ,look for smsc.c
1)http://lxr.free-electrons.com/source/drivers/net/phy/
2)http://git.kernel.org/cgit/linux/kernel/git/torvalds/linux.git/diff/drivers/net/phy/smsc.c
3)http://permalink.gmane.org/gmane.linux.network/123235
You can try compiling the coding and adding it to the driver , but I guess the kernel should be recompiled to included that..
Thanks, and hope this helps
-E^3
Hi E^3,
DeleteI have been asking around and it seems that linux kernel 3.0.8+ works with minx mini x5.
the network driver is vmac but you have to patch arch/arm/mach-rk30/board-rk30-sdk-vmac.c fonction rk30_rmii_power_control(int enable)
tatic int rk30_rmii_power_control(int enable)
{
struct regulator *ldo_rmii;
#if defined (CONFIG_MFD_WM831X_I2C)
ldo_rmii = regulator_get(NULL, "ldo9");
#endif
#if defined (CONFIG_MFD_TPS65910)
// if(g_pmic_type == PMIC_TYPE_TPS65910)
ldo_rmii = regulator_get(NULL, "vaux33");
#endif
if (ldo_rmii == NULL || IS_ERR(ldo_rmii)){
printk("get rmii ldo failed!\n");
return -1;
}
SMSC LAN8720A is the PHY controller handled by phylib
Now, this all sound promising but I have not been able to apply this to the kernel. This is was beyond my knowledge right now.
I tried to substitute the rk30_rmii_power_control from the kernel source code but I couldnt get it to compile. I think it didnt compile because of other issues and the fact that I have never compiled a kernel before.
Could you please lend me a hand with this?
Thanks again for all the help.
Regards,
Javier
Hi Javier,
DeleteGood Day.
My apology for the very late reply, I can do the kernel compiling ,though I am not sure if really this is the right code /driver .
Have your tried to solve this issue?
Thanks
E^3
Hi, i have a question about the mali 400 GPU. Is the hardware acceleration supported on this linux? so is 1080p movie viewing possible?
ReplyDeletethanks !
Hi Sir Jeff,
ReplyDeleteGood Day.
I think there is none yet, If you are interested about the hardware acceleration I will give you the link on how to do it .
http://hwswbits.blogspot.com/2013/04/3d-hw-acceleration-on-picuntu-linux.html
Cheers!
-E^3
This link seems to be brokenhttp://cdn02.arctablet.com/mirrors/picuntu_home-io/
ReplyDeleteHi brother,
DeletePlease try this..
https://googledrive.com/host/0BztHRbE8mM49TDc3WW1wMERUUkk/Ubuntu12.10_armhf_MINIXx5_CLEAN_ver0.1.tgz
Cheers!
-E^3
Hi can you provide valid links to download files the ones in description dont seem to be working
ReplyDeleteThanks
Sir,
ReplyDeleteI will try to update it just for a while.
Thanks
-E^3
Hi Sir ,
ReplyDeleteTry the instruction in this freaktab page
http://freaktab.com/forum/tv-player-support/rk3066-devices/minix-neog4-x5-etc/4752-cwm-minix-neo-x5-roms
There are still images that can be flash in Minix NEO X5.
If you want to explore you can try the compilation,flashing and installation of RK3066 in the Rockchip website.
I am certain it could all work, just stay in Ubuntu 12.xx for Neo X5.
I have already disposed my old Minix NEO 5 so I have no machine to work on . But I will still try to find those files :)
Thanks
E^3
To all.
ReplyDeleteImages and some quick tutorials are here!
http://freaktab.com/forum/tv-player-support/rk3066-devices/minix-neog4-x5-etc/4752-cwm-minix-neo-x5-roms
Thanks
E^3
Any chance to get an updated url for the Ubuntu image? Br, Henrik
ReplyDeleteHi ,
DeleteMy apology , I think you can proceed to RK3066 https://www.waveshare.com/w/upload/7/70/MarsBoard-RK3066-Pro-User-Manual.pdf
i can already write manual luts interface with 5G without a headset and just invented a krilan lazer god cannon with subsonic resonance catchers.Am i neo? who do i approach with my ideas?
ReplyDelete0223006110 in New Zealand
Deletehi, is there a way to get back online all the broken links??
ReplyDeleteThank you
Microcontroller Embedded Design: Minix Neo X5 Booting In Linux(Ubuntu) >>>>> Download Now
ReplyDelete>>>>> Download Full
Microcontroller Embedded Design: Minix Neo X5 Booting In Linux(Ubuntu) >>>>> Download LINK
>>>>> Download Now
Microcontroller Embedded Design: Minix Neo X5 Booting In Linux(Ubuntu) >>>>> Download Full
>>>>> Download LINK
Very informative blog. Thanks for sharing with us. Keep sharing!!
ReplyDeleteDo you want to buy Android Embedded panel PCs Online?
Buy Android Embedded panel PCs