Introductions:
This is a parallel task with my RoBook Scanner, I am using this development to control motors installed in a Robot Arm.An IDE of a RoBook Scanner is installed in the computer and its communications is trough USB. A PIC-USB then will be very helpful and adequate for our requirements .Another,it should be running in Linux with a pre-build drivers in com port.This simple system is expected to have an easy work flow every time the scanning event occurred ,there would be a corresponding status sent to a microcomputer to trigger its I/O ports from turning the motors .Hence ;the robotic arm will respond in accordance to the program flow and there will be synchronizations of task in the RoBook Scanning system.
Okey, so what's Penguino?
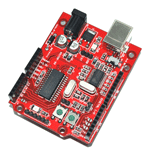
Penguino is a PIC184550 USB development board which is running in fully Opensource tools pioneered by a French electronic engineer Jean-Pierre MANDON one of the main purpose is to have a useful application in the academic institution and a hacking lab for a hobbyist
Objectives:
To create libusb application program , either by thread or coroutine(scripting).
To communicate PC and micro-controller via USB (host & device).
To apply USB interfacing in our RoBook Scanning.
To communicate PC and micro-controller via USB (host & device).
To apply USB interfacing in our RoBook Scanning.
Requirements:
Software:
Ubunto Linux OS ( Ubunto-10.10)
libusb
penguino(linux)
-sdcc
-gputils
-gmasm
LUA(C scripting language for embedded)
Python and libraries:
python-wxversion
python-wxtools
python-wxgtk2.8
python-wxgtk2.6
pySerial (Python serial module)
bootloader for PIC184550 (http://www.hackinglab.org/pinguino/download/latestfirmware/bootloaderV2.12.hex)
Hardware:
Penguino development board
Desktop/PC
Methodology:
1) Software downloading ,compilations and installation
2) Penguino setup (adaptor, USB cable and Pinguino board)
3) Loading the boatloader hex file for PIC184550 mcu.
4) USB host program in Pinguino IDE
4.a) Select sample code for LUA
4.b) Select sample code for libUSB
5) Device /client USB ID (CDC) program to PC (where Pinguino IDE is running)
5.a) Sample USB terminal (using Pyserial)
5.b) Pinguino sample code on USB hosting.
So here we go...
Installing Python
root@localhost# sudo apt-get install python
Installing LUA
root@localhost# wget http://www.lua.org/ftp/lua-1.0.tar.gz
root@localhost# tar -zxvf lua-1.0.tar.gz
root@localhost# mv lua-1.0 /usr/local/lua
root@localhost# cd /usr/local/lua
root@localhost# ./configure
root@locahost# make
root@localhost# make install
Installing LUA-libraries
root@localhost# wget http://luaforge.net/frs/download.php/4252/lualibusb-0.4.tar.gz
root@localhost# tar -zxvf lualibusb-0.4.tar.gz
root@localhost# cd /usr/local/lualibusb-0.4
root@localhost# ./configure --prefix=/usr/local/lua
root@localhost# cd liblua/
root@localhost# vim Makefile
Then change the following line with your liblua PATH=?
LIBUSB_SRC = /usr/include/libusb-1.0 #change with your libusb sources folder
LUA_SRC = /usr/include/lua5.1 #change with your lua sources folder
root@locahost# make && make install
Find lualibusb.so
root@localhost# ls lualibusb.so
If the file is there then rename this file to libusb.so copy it in "/usr/local/liblua/lua5.1/"
root@localhost# mkdir /usr/local/liblua/lua5.1/
root#localhost mv lualibusb.so /usr/local/liblua/lua5.1/libusb.so
Lua add-ons libraries
root@localhost#sudo apt-get install liblua5.1-0-dev libusb-dev libreadline-dev
Installing Pyserial
root@localhost# sudo apt-get install pip-python
root@localhost# sudo apt-get install python-serial
Installting Penguino USB Terminal
root@localhost# wget http://sites.google.com/site/pinguinotutorial/lua-usb-terminal/pinguinoUSBterminal.tar.gz
root@localhost# tar -zxvf pinguinoUSBterminal.tar.gz
root@localhost# cd pinguinoUSBterminal
root@localhost# ./configure --prefix=/usr/local/usbterminal
root@localhost# make & make install
Installing Penguino
root@locahost# wget http://www.hackinglab.org/pinguino/download/pinguino%20beta%209/pinguino_beta9-05_linux.tar.gz
root@locahost# tar -zxvf pinguino_beta9-05.tar.gz
root@localhost# mv pinguino_beta9-05 /usr/local/pinguino
root@localhost# cd /usr/local/pinguino/
root@localhost# pythton pinguio_beta9-05.py
Detail(0) Getting the necessary libraries for pinguino

Detail (1) Installing and compiling Pinguino

Detail (2)Pinguino Graphics IDE

Detail(3)Pinguino Editor

Detail(4)Development board fron e-gizmo store

Detail(5) Start of cloned Pinguino board setup

Remarks:
Note:
The Pinguino picture that appears above came from the e-gizmo website(Please support "Ang galing ng Pinoy")
Conclusions:
