
 |
| AVR32 Module e-Gizmo |
Introductions:
Hello Dabarkads;maybe a week ago or so that our familiar local geek's store (e-Gizmo) had cooked another gadget for us -a considerable cheap,powerful and fast MCU which has a promising wide applications.This is an AVR32 (AT32UC3L0128) with 50MHZ clock,SPI,I2C,128KB(Flash) and more in a sort dongle type of modular package .So let's again give some important tips & tricks of creating a gcc IDE using an Eclipse development environment. This post in my blog details the steps used to get gcc running in our own workspace. Unfortunately, setting up
Eclipse as an environment to develop gcc is non-tasky. To tell you folks, having a GUI to some CLI based compilers such as SDCC,GCC/G++ (Unix) ,C/C++ is not any more a problem or hinder to simulate our code instead of a console interface. In this scratch article ,running the source program in an Atmel variants and other brand of MCUs could be made possible using eclipse IDE as a slight editor.We will discuss here the customization of an Eclipse C/C++ environment as a requirements of compiling source code fitted in our AVR32 board. An Eclipse editor needs an installed Atmel GNU tool chain: avrdude,avr32-gcc,avr-gcc and other required libraries to run/compile code in AVR32.
There are miscellaneous software programmer for AVR32 module:(1) Flexible In-system Programmer version III or FLIP3 (flip.3.x.xx.tar.gz) bundled with batchISP as tool to program parts containing an embedded Atmel ISP. This software has a version for both Linux and Windows OS See this article for further technical details: (1) http://datasheet.octopart.com/ATEVK1101-Atmel-datasheet-166485.pdf.(2)http://www.atmel.com/Imag /avr32studio_release_notea_2.6.0.pdf.
Hence ,we only need an AVR32 module connected to our PC via USB-Serial interface-that's all our simple development for now.
Note:
All these utilities are free to download and can be run in Linux.
1) To create gcc IDE for AVR32 by using C/C++ Eclipse editor
2) To learn how-to program (compile,flash,fuse,boot-load) in an ATmel AVR32
3) To explore the potential use of AVR32 for variety of embedded applications
Requirements:
Hardware:
USB to Serial converter
e-Gizmo AVR32 module (http://www.e-gizmo.com/KIT/AVR32.html)
Software:
Linux OS : Ubunto /Fedora 1X
AVR32 plugin (UC32XX,AVR32 GNU tool chain,batchISP and more)
http://distribute.atmel.no/tools/avr32studio/releases/latest/
AVR32 GNU Tool chain (32/64 bit Linux)
http://www.atmel.com/tools/ATMELAVRTOOLCHAINFORLINUX.aspx
JAVA SDK Environment -installable in Linux Shell
Eclipse
http://www.eclipse.org/downloads/packages/release/galileo/r
FLIP3
http://www.atmel.com/tools/flip.aspx
http://www.atmel.com/Images/flip_linux_3-2-1.tgz
DFU
http://nchc.dl.sourceforge.net/project/dfu-programmer/dfu-programmer/0.5.4/dfu-programmer-0.5.4.tar.gz
Miscellaneous Documents
http://www.atmel.com/devices/at32uc3l0128.aspx?tab=documents
Methodology:
1) Install avr-gcc compiler and other libraries
root@localhost# yum install gcc-avr avr-libc avrdude
2)Installing DFU programmer
root@localhost# yum install dfu-programmer
3) Install Java SDK
root@localhost# sudo apt-get install openjdk*
4) Download and install the Eclipse editor
root@localhost# sudo apt-get install eclipse-platform eclipse-jdt eclipse-cdt
5) Download and install AVR32 plugin
Click "Window" -> "Install Software" ->
6) Configure AVR32 (AT) setting in the GCC-IDE
7) Create a simple circuit configuration for the AVR32 module
8) Compile and run the program
9) Load the code in the AVR32 board
10) Test the expected output of the code in the AVR32 circuit
Details:
Detail(1) AVR32 GNU tool chain

Detail(2)Launching Eclipse editor

Detail(3) Eclipse Platform


Detail(5)AV32 Utilities and Tool chain

Detail(6) Installing AVR32 plugin (Utilities & Tools)

Detail(7) Restart to update Eclipse editor

Detail(8) AVR32 Software Licenses

Detail(9) Installed AVR32 utilities and tool chain

Detail(10) AVR32 Tool chain setting

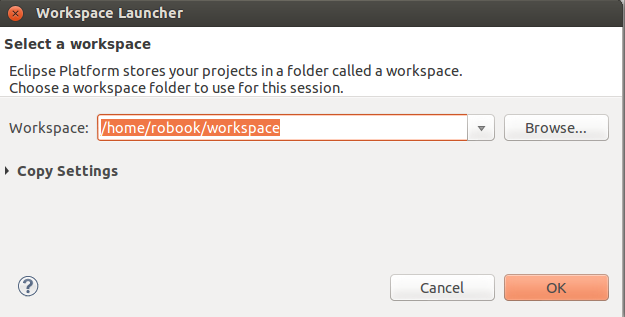
Detail(11) Selecting a workspace
Detail(12) Device Selection

Detail(13)AVRdude configuration

Detail(14) Create a C/C++ source file

Detail(15) simple GCC-IDE (Non-Trivial)

Detail(16)AVR32 GCC IDE with sample code...

..to be continued
Remarks:
Software programmer options : FLIP3 or DFU (Linux)
Conclusions:
Just KISS (..keeping it simple and stupid)