
Embedded Software and Hardware design: Hardcore I/O circuit interfacing ,Open Source Embedding Design,Data protocol coding and porting.
Friday, December 6, 2013
Controlling & Programming Raspberry Pi (GCC/G++)
Introduction:
mysql in c
lpcap in c
serial in c
get time in c
raspberry Pi pure C
Requirements:
Hardware:
Raspberry Pi board version B
SD Card
Software:
Win32sdkimage
Raspberrian Image
Slitaz Image
Gcc/G++
Objectives:
Methodology:
Summary:
Remarks:
Conclusion:
Tuesday, November 5, 2013
e-Gizmo AVR32 GCC IDE:Bootloading &Programming
 |
| AVR32 Module e-Gizmo |
Introductions:
Hello Dabarkads;maybe a week ago or so that our familiar local geek's store (e-Gizmo) had cooked another gadget for us -a considerable cheap,powerful and fast MCU which has a promising wide applications.This is an AVR32 (AT32UC3L0128) with 50MHZ clock,SPI,I2C,128KB(Flash) and more in a sort dongle type of modular package .So let's again give some important tips & tricks of creating a gcc IDE using an Eclipse development environment. This post in my blog details the steps used to get gcc running in our own workspace. Unfortunately, setting up
Eclipse as an environment to develop gcc is non-tasky. To tell you folks, having a GUI to some CLI based compilers such as SDCC,GCC/G++ (Unix) ,C/C++ is not any more a problem or hinder to simulate our code instead of a console interface. In this scratch article ,running the source program in an Atmel variants and other brand of MCUs could be made possible using eclipse IDE as a slight editor.We will discuss here the customization of an Eclipse C/C++ environment as a requirements of compiling source code fitted in our AVR32 board. An Eclipse editor needs an installed Atmel GNU tool chain: avrdude,avr32-gcc,avr-gcc and other required libraries to run/compile code in AVR32.
There are miscellaneous software programmer for AVR32 module:(1) Flexible In-system Programmer version III or FLIP3 (flip.3.x.xx.tar.gz) bundled with batchISP as tool to program parts containing an embedded Atmel ISP. This software has a version for both Linux and Windows OS See this article for further technical details: (1) http://datasheet.octopart.com/ATEVK1101-Atmel-datasheet-166485.pdf.(2)http://www.atmel.com/Imag /avr32studio_release_notea_2.6.0.pdf.
Hence ,we only need an AVR32 module connected to our PC via USB-Serial interface-that's all our simple development for now.
Note:
All these utilities are free to download and can be run in Linux.
1) To create gcc IDE for AVR32 by using C/C++ Eclipse editor
2) To learn how-to program (compile,flash,fuse,boot-load) in an ATmel AVR32
3) To explore the potential use of AVR32 for variety of embedded applications
Requirements:
Hardware:
USB to Serial converter
e-Gizmo AVR32 module (http://www.e-gizmo.com/KIT/AVR32.html)
Software:
Linux OS : Ubunto /Fedora 1X
AVR32 plugin (UC32XX,AVR32 GNU tool chain,batchISP and more)
http://distribute.atmel.no/tools/avr32studio/releases/latest/
AVR32 GNU Tool chain (32/64 bit Linux)
http://www.atmel.com/tools/ATMELAVRTOOLCHAINFORLINUX.aspx
JAVA SDK Environment -installable in Linux Shell
Eclipse
http://www.eclipse.org/downloads/packages/release/galileo/r
FLIP3
http://www.atmel.com/tools/flip.aspx
http://www.atmel.com/Images/flip_linux_3-2-1.tgz
DFU
http://nchc.dl.sourceforge.net/project/dfu-programmer/dfu-programmer/0.5.4/dfu-programmer-0.5.4.tar.gz
Miscellaneous Documents
http://www.atmel.com/devices/at32uc3l0128.aspx?tab=documents
Methodology:
1) Install avr-gcc compiler and other libraries
root@localhost# yum install gcc-avr avr-libc avrdude
2)Installing DFU programmer
root@localhost# yum install dfu-programmer
3) Install Java SDK
root@localhost# sudo apt-get install openjdk*
4) Download and install the Eclipse editor
root@localhost# sudo apt-get install eclipse-platform eclipse-jdt eclipse-cdt
5) Download and install AVR32 plugin
Click "Window" -> "Install Software" ->
6) Configure AVR32 (AT) setting in the GCC-IDE
7) Create a simple circuit configuration for the AVR32 module
8) Compile and run the program
9) Load the code in the AVR32 board
10) Test the expected output of the code in the AVR32 circuit
Details:
Detail(1) AVR32 GNU tool chain

Detail(2)Launching Eclipse editor

Detail(3) Eclipse Platform


Detail(5)AV32 Utilities and Tool chain

Detail(6) Installing AVR32 plugin (Utilities & Tools)

Detail(7) Restart to update Eclipse editor

Detail(8) AVR32 Software Licenses

Detail(9) Installed AVR32 utilities and tool chain

Detail(10) AVR32 Tool chain setting

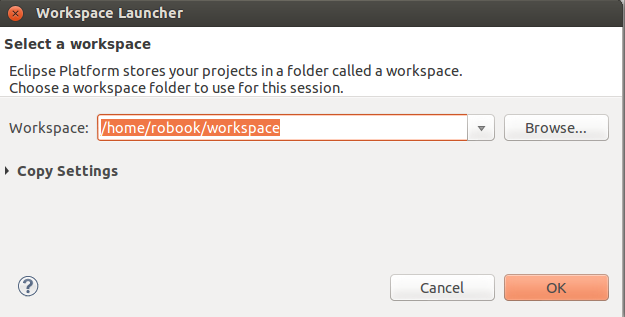
Detail(11) Selecting a workspace
Detail(12) Device Selection

Detail(13)AVRdude configuration

Detail(14) Create a C/C++ source file

Detail(15) simple GCC-IDE (Non-Trivial)

Detail(16)AVR32 GCC IDE with sample code...

..to be continued
Remarks:
Software programmer options : FLIP3 or DFU (Linux)
Conclusions:
Just KISS (..keeping it simple and stupid)
Sunday, September 15, 2013
Arduino MySQL connector (Arduino On-line/real-time DataBase)

Introductions:
Sometimes when computing machines are becoming smaller and smaller,we cant deny the fact that its not only the processing capabilities that we must consider , but also the capacity to store data.Since we have discussed awhile ago the speed and efficiency of this small machine/s,let's also tackle ways on how to use them as client or server to save bulk of data.Traditionally , data logging in an embedded system should have a third party connector/s or hook-up interface linked to the computers or servers before micro-controllers are able to store bulked signals or raw data .A good example was MCU gathered signals which are fed to the serial port of a PC(server) then parse via PHP and dumped those data in mysql.Another example is dumping all data at the specified ROM built in to the MCU, but the former was a better recommendation.
Just recently, I've came up to a data logger system design , comprises of different transducers which are capable of detecting digital and analog signals considered as critical parameters inside the Data Center.To name those signals: light, humidity,temperature,sounds,distance and etc. Our Arduino functions as a controller to gather data , and its embedded program measures the equivalent units to represent the scale of data sense by these transducers.
In this scratch article, we will introduce a new mysql connector ported by Dr. Chuck on his blog http://drcharlesbell.blogspot.com/2013/04/introducing-mysql-connectorarduino_6.html
.We've also used Wiznet Ethernet Shield available at the local store owned by "ThinkBox" (http://store.mytinkbox.com) ,you can order the module on-line by the way. So our contribution will be to utilize, maximize its given functions and procedure just like an ordinary SQL are coded and give an example on programming it.You may try to explore and find out how it simplifies database in an embedded systems.
Requirements:Just recently, I've came up to a data logger system design , comprises of different transducers which are capable of detecting digital and analog signals considered as critical parameters inside the Data Center.To name those signals: light, humidity,temperature,sounds,distance and etc. Our Arduino functions as a controller to gather data , and its embedded program measures the equivalent units to represent the scale of data sense by these transducers.
In this scratch article, we will introduce a new mysql connector ported by Dr. Chuck on his blog http://drcharlesbell.blogspot.com/2013/04/introducing-mysql-connectorarduino_6.html
.We've also used Wiznet Ethernet Shield available at the local store owned by "ThinkBox" (http://store.mytinkbox.com) ,you can order the module on-line by the way. So our contribution will be to utilize, maximize its given functions and procedure just like an ordinary SQL are coded and give an example on programming it.You may try to explore and find out how it simplifies database in an embedded systems.
Mysql Connector
Mysql Server on PC
Arduino2560 Mega
Wiznet Ethernet Shield (http://store.mytinkbox.com or http://www.e-gizmo.com/ )
Source: Hi-Techno Barrio http://code.google.com/p/hi-techno-barrio/downloads/list
Objectives:
(1)To enhance the capabilities of microprocessor and macro-processor as clients in a data base system.
(2) To test new Mysql connector
Methodologies:
1) Download Mysql connector
https://launchpad.net/mysql-arduino
2) Unzip the Mysql connector zip files
root@localhost# unzip mysql_connector.zip
3) Copy the files inside the Arduino library folder
root@localhost# mv mysql_connector MYSQL
root@localhost# cp -r MYSQL /usr/share/arduino/libraries
root@localhost# cp -r sha1 /usr/share/arduino/libraries
4) Cut and paste the sample code given in the Arduino IDE
root@localhost# arduino dcms.ino
5) Compile the code with your preferred Arduino2560
Note:
5.1) Select the proper baud rate (serial sets to 115200 kbs)
5.2) Just point mouse to the arrows and functions will be highlighted,click the arrows for compiling and loading
5.3) Choose the preferred sensors function in the sample program
6) Design data schema (Mysql)
root@ localhost# mysql -u root -p
6.1) create mysql database
mysql> create dcmsDB;
6.2) display mysql database
mysql> show databases;
6.3) choose mysql databse
mysql> use dcmsDB;
6.4) create table in mysql
mysql> CREATE TABLE `dcmsData` (
`sensorid` int(11) NOT NULL AUTO_INCREMENT,
`Humidity` FLOAT DEFAULT NULL,
`Light` INTEGER ,
`Noise` INTEGER DEFAULT NULL,
`Smoke` INTEGER DEFAULT NULL,
`Temperature` FLOAT DEFAULT NULL,
`AC` INTEGER DEFAULT NULL,
`DayTime` DATETIME DEFAULT NULL,
PRIMARY KEY (`sensorid`),
UNIQUE KEY `rowid_UNIQUE` (`sensorid`)
) ENGINE=InnoDB DEFAULT CHARSET=latin1;
6.5) insert row data mysql table
mysql> INSERT INTO dcmsData (Humidity,Light,Noise,Smoke,Temperature,AC,DayTime) values('100','200','300','400','500','600',NOW());
6.6) display table structure in mysql
mysql> describe dcmsData
6.7) display data
mysql> SELECT * FROM dcmsData;
7) Just to give an overview , here are some parts of the program:
(6.1) Include files
#include "NewPing.h"
#include "autonomos.h"
#include "webcontrol.h"
#include "udpsend.h"
#include "DHT.h"
// include files for mysql
#include "SPI.h"
#include "Ethernet.h"
#include "sha1.h"
#include "mysql.h"
6.2) /* Setup for Ethernet Library */
/* Setup for Ethernet Library */
byte mac_addr[] = { 0xDE, 0xAD, 0xBE, 0xEF, 0xFE, 0xED };
IPAddress server_addr(192,168,1,2);
IPAddress ip(192,168,1,177);
IPAddress gateway(192,168,1, 1);
IPAddress subnet(255, 255, 255, 0);
char sqlbuf[128];
char sqlDbase[] = " USE dcmsDB";
6.3) /*Setup for MySQL */
unsigned int mysqlPort=3306;
Connector my_conn; // The Connector/Arduino reference
char user[] = "root";
char password[] = "Igorotzki";
boolean sqlconnect= false;
(6.4) Mysql procedures
void mysqlBegin()
{
delay(350);
Serial.println("connecting MySQL Server..");
if (my_conn.mysql_connect(server_addr, mysqlPort, user, password))
{
sqlconnect=true;
Serial.println("Query Success!");
delay(150);
my_conn.cmd_query(sqlDbase);
}
else
{
Serial.println("Connection failed.");
}
}
// sending data to mysql
void mysqldata()
{
// uncomment to use the given functions
// tmp = temperature();
// ht = humidity();
// smk = smoke();
// ns = noise();
// lt = light();
// ac = ACData();
if (sqlconnect==true)
{
delay(150);
//"INSERT INTO dcmsData (Humidity,Light,Noise,Smoke,Temperature,AC,DayTime) values('100','200','300','400','500','600',NOW()) ";
sprintf(sqlbuf, "INSERT INTO dcmsData (Humidity,Light,Noise,Smoke,Temperature,AC,DayTime) values ('%f','%d','%d','%d','%d','%f',NOW())",ht,lt,ns,smk,tmp,ac) ;
my_conn.cmd_query(sqlbuf);
Serial.println("Data stored!");
}
} // end mysql...!
6.5)
// main program
Void loop()
{
mysqldata();
range(1);
robotCommand("independent");
cameraPosition();
}
6.6)
If you are interested with the complete code of this techno-blog, please include your e-mail account in the comment portion!
Details(1) Data logging (DHT11,LM35,LDR,Sound,URF)

Details(2) Mysql Connector download site

Details(3) Mysql connector and its compilation

Details(4) Unzip the mysql connector files

Details(5) Successful compilation of Mysql connector using Ubuntu

Details(6) Mysql shema ->database ->tables

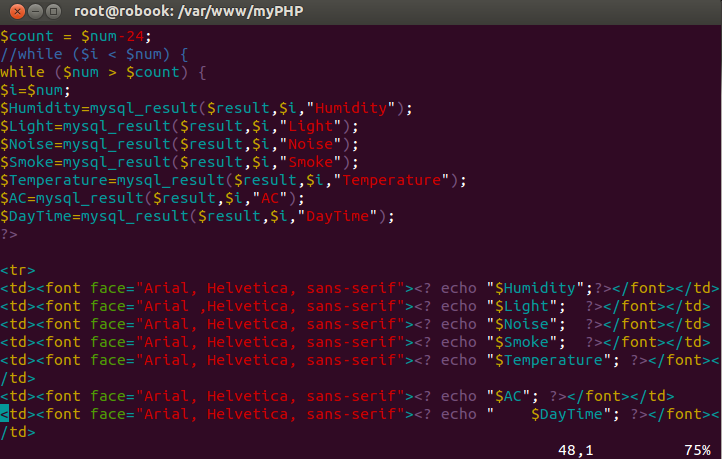
Details(7) Php code

Details(8): Web page Display (PHP)

Summary:
Trouble(1)Serial.print function ("Error 255=." and then "Connection failed")
Shooting:
GRANT ALL ON *.* TO 'root'@'%' IDENTIFIED BY 'your_password';
Trouble(2) Using database
Shooting: Please add the following procedure
my_conn.cmd_query("USE dcmsDB);
Trouble(3)
in sha1.h virtual void write(uint8_t);
error: conflicting return type specified for 'virtual void Sha1Class::write(uint8_t)'
do you know how to fix it?
Shooting:
Apply the diff included with the source code.
Trouble(4) Declaring floating point in mysql query
Shooting:
float t = do_something();
char buf[128];
sprintf(buf, "INSERT INTO test.motion VALUES (NULL, '%f')", t);
my_conn.cmd_query(buf);
Conclusions:
So we have embedded mysql in MCU
Sunday, August 25, 2013
Writing Image and booting Linux from MK808/RK3066

Introductions:
Now you would ask me;What guts I am
trying to prove on tracking the development of these mini-PC
sticks?Well, nowadays ,computers are becoming smaller and smaller and that
proportionate to their cost-cheaper.And I know you would believe me, single board PC
did not compromise computing speed ,functionality ,efficiency yet with
lesser consumption of electricity (5V/2A) ; we called this "nano-technology" on
computers.Imagine a supercomputing machine is just smaller than the
palm size of your hand.Simple,with its cheap price, I can purchase
numbers of minis-PC and afterwards create a prowess of varied
R&D applications.A variety of testing instruments:embedded
Oscilloscope,Analyzer, high speed cameras,and all the likes.Because it's a
light-weight machines ,we can board as many PCs as we can, to
make our machine or robots think, process more and intelligent
enough to respond in our specific purpose .An out-of-the-box super computing machine,
clustered mini-sticks is just an appliance that can be stored atop your
desk.The rest are the R&D of a lifetime-not yet to be told-but
they're arrayed in the mind .This minute gadget is a heavenly concept
making things happen in reality( :) ).
I have tried different single board PC from STMF32 ,ARM Cortex 3, Beagle board,Mini2440 and mini6440 and had experienced the difficulties in loading or flashing firmwares into its embedded system.Though its quite complex , I was lucky that there were several documents available as an included resources,besides they have the technical support on-line.Sometimes you need to decode Chinese language to know the hidden specifications-at least that could be a right path of porting different codes and libraries.
RK3066 is dual Core Cortex-A9 processor running at up to 1.6 GHz produced on 28 nm process, with quad core Mali 400 @ 533 Mhz.These features are enough to settle in the higher application system-but when it comes to controlling,brute forcing hardware applications -we have a different story.
Actually , I did n't have to flash android OS into Picunto or Ubunto,but it so sad that Android OS is not meant for embedded and servering applications.Another is that Rockchip is still in the stone age, they require NDA(non disclosure agreement) and $5000 to send you SDK for building Android images which even have no sources inside but binary blobs.So I have no choice but to change its OS into an appropriate one. Yet this is not an easy task for there is no instant or direct Linux installations in the RK3066 chips other than android itself.
All Rockchip kernel and Linux support so far is done by group of
hackers who reverse engineer their code for fun and they have already
significant success.The community would like to thanks hacker/crackers who had patiently ported and given source code for free: AndrewDB,Olegk0,JustineTime4Tea,mosfet,E^3 and others.
So folks ,please read and join me as this scratch article go along the saga and odyssey of porting ,debugging and unlocking the trade secrets of this nano-made gadgets and bring the breakthrough into the open-source community.
Requirements:
Software:
MK808 kernel image (recovery.img)
https://github.com/olegk0/rk3066-kernel
Rooted Image files
http://cdn03.arctablet.com/mirrors/picuntu_home-io/homeio_rc1.tar.gz
Olegk0 Google Drive Folder
https://drive.google.com/folderview?id=0B6QRwjacGTzCU3RWZ1M2d1FkcTg&usp=drive_web
Olegk0 Google Drive Folder
https://drive.google.com/folderview?id=0B6QRwjacGTzCU3RWZ1M2d1FkcTg&usp=drive_web
https://github.com/justgr/arnova-tools
Hardware:
Paper clip
MK808 mini-PC stick
micro-SD adapter
micro-SD card
Objectives:
To write and flash RK3066/MK808 image by using Linux alone(no windows!)
To replace default android OS by Picunto/Ubunto for future system development
To maximize the applications of mini-PC MK808 as dual core running in Linux
Methodology:
Download the latest release versions of MK808/RK3066 Linux image(cut & paste in your browser)
https://doc-0c-b8-docs.googleusercontent.com/docs/securesc/ha0ro937gcuc7l7deffksulhg5h7mbp1/5c55spo7th4lg7cfnlu8e07a5edfmro1/1384315200000/09152317978381813842/*/0B6QRwjacGTzCNG45bGZWRHlycUE?h=16653014193614665626&e=download
Find the necessary tools for flashing firmware image in the SD card
root@locahost# wget
https://github.com/justgr/arnova-tools/blob/master/rkflashtool/rkflashtool.cInstall the required USB software libraries in Linux OS
root@localhost# sudo apt-get install libssl-dev libcrypto++-dev
Press down the recovery button (using a paper clip)
Power up the RK3066 device from only the OTG port using a standard usb cable
Note:
(special OTG cable required or shorting of the sense pins)
Please plugged the OTG-USB cable into your PC (running linux.)
After 5 seconds release the button. observed that no led will turn on at this point.
Run dmesg and you should see something like detail 1:
root@localhost# dmesg
Run lsusb and make note of the device id
root@localhost# lsusb
My MK808 vendor ID is 2207:300a
Let's compile the rkflashtool.c
root@localhost# tar -zxvf rkflashtool.tar.gzroot@localhost# cd rkflashtool/
root@localhost# vim rkflashtool.c
...cut and paste the code phrase highlighted in detail (3) then run the program
root@localhost#gcc -o rkflashtool rkflashtool.c -lusb-1.0 -O2 -W -Wall -s.
We're now ready to read the flash(a moment of truth :) ).
As a first step you may dumped the entire 8GB NAND flash as a backup like so
Note:
It will take some time to backup the whole NAND.
root@locahost rkflashtool r 0x00000000 0x01000000 > myflashbackup.bin
To quickly get an idea of where everything is in the flash you can run CLI command below . It will reveal the parameters which include the offsets for all images in NAND including boot, system and user.
root@localhost# hexdump -C myflashbackup.bin | more
As an example to grab the kernel I did the following:
root@localhost# rkflashtool r 0x00004000 0x00004000 > mk808kernel.img
To upload a new kernel do the following:
root@localhost# rkflashtool e 0x00004000 0x00004000
root@localhost# rkflashtool w 0x00004000 0x00004000 < recovery.img
Tips!:
After a successful loading the kernel image (recovery.img) you can now reboot the stick and check picture details (6 & 7)- you're on the right track brother.So you may proceed now to partitioning your SD card and inserting Debian file-systems into it:)
Partitioning your SD Card
root@localhost# yum install gparted*
root@localhost# gparted
1) Create an "ext4" partition
2) resize the partition atleast 5GB or larger
3) label it with "linuxroot"
4) Apply the changes
After the kernel image was flashed, it's time to copy your linuxroot(File System), be sure that you are in a root mode
root@localhost@ tar-zxvfp home_io.tar.gz /run/media/robook/linuxroot
or
root@localhost# tar -zxvf home_io.tar.gz
root@localhost# cd picunto_linuxroot_rc
root@localhost# cp -R * /run/media/robook/linuxroot
Note! Please wait until all files are copied to avoid errors in the picunto boot up
Details:
1) Please run the lsusb command

2)Next run the dmesg command to find vendors ID

(3)After finding the vendors ID ,copy the highlighted code in the rkflashtool.c

(4)Testing rkflashtool-> dumping NAND

(5)Flashing the new kernel image "recover.img"

(6)Booting the MK808 in Linux -pre install "BusyBox OS"

(7)System and files

(8) Partitioning the SD card ("ext4"-File System- 5++ GB

(9) MK808 device using HDMI VGA adapter

10) Picunto2.2 Login

11)Picunto 2.2 Desktop (xfce)

12) Checking OS libraries and apps

Remarks:
Accomplished the easy task (?) of booting MK808 in Linux
Trouble: BusyBox not booting
Shooting: Please redump the micro-SD card using the rkflashtool
Trouble: Need complete files
Shooting: Please get the latest kernel image and rooted image linux files(application etc)
Trouble: "Mountall Event Fail
Shooting: Try recopying the linuxroot by using "cp -a * or tar -zxvpf" to transfer the compress files into the SD card "ext4" linuxroot directory.
1) Incomplete/unfinished copy
2) Fail with root permission and authorizations transfer of files
Conclusions:
I have a mini-PC MK808 (dual core) running in Linux(how about that bro?)
Tuesday, August 13, 2013
USBasp + Arduino(Mega)2560 bootloading in Linux Arduino IDE (ACEduino2560)

Introductions:
Just recently,we've been trough the use of an open-source applications and patronizing its community development ; surprisingly enthusiasts all over the globe are very much overwhelmed in participating the continuous evolutions of an open-source technology.And we are not far from the said expectations , our electronic stores are now tapping-up the distributions of these materials to the cheapest cost that local geeks and enthusiasts are able to afford of.Gone are those days when we are under the verdict of proprietary vendors such as Zilog,PIC,Renessas and other microchip distributors. I want to mention the following e-stores in the city:
Alexan ,e-Gizmo and other on-line stores (tipidPC, sulit.com ,ayos dito) are vendors where we can buy the series of
MCUs especially Arduino with reasonable price.
Well, our concerns are embedded kits ;yes, the Arduino things and other assorted gadgets ,this rebranded MCU is having the domination in the global e-store.We have noticed that Arduino sheilds' package is the included Atmel microchips , and became an open hardware and software that completely sets the requirement of starting and advancing the learning curve of an embedded system design.This is the main reason that enticed our local e-hobbyists to avail the Arduino MCUs which had given all their resources completely open and free for modifications i,e: DIY,documents,source code and innovations. Perhaps Arduino unravel the "Mt. everest" of complex embedded system into the level of laymen's know-how. E-hobbyists are introduced to their limitless creativity and ingenuity-we could be one of them.
So, this techno blog is all about giving you the idea on how to work on Arduinos using pure Linux for its compiler and IDE.And the purpose is to reload and upgrade default firmware to its new release versions that will be published in the Arduino web site(http://arduino.cc/en/Main/Software). This time,I will give you the how-tos of firmware upgrading or bootloading the ACEduino Mega 2560 with USBasp programmer which can be purchased in Alexan and e-Gizmo respectively.So folks please have a try.. :)
avrdude
arduino IDE version 1.5X
USBasp http://www.e-gizmo.com/KIT/usbasp.html
Arduino Mega 2560 http://www.alexan.com.ph/index.php/training-modules/227-aceduino-mega-2560
Objectives:
To solve USBasp programmer usb setting in Linux
To use USBasp programmer in Arduino IDE
Methodology:
I) Installations
root@locahost# yum install arduino*
root@localhost# yum install gcc-*
root@localhost# yum install avrdude*
2) Testing avrdude
root@localhost# lsusb
root@localhost# avrdude
3) Bootloading using avrdude
root@localhost# cd /usr/share/arduino/hardware/arduino/bootloaders/stk500v2/
root@localhost# avrdude -c usbasp -p m2560 -u -U flash:w:stk500boot_v2_mega2560.hex
4) Using Arduino IDE
root@localhost# arduino
5) Bootloading using Arduino IDE
5.1) Tools-> Programmer->USBasp
5.2) Tools->Board->Arduino Mega 2560
5.3) Tools->Bootloader
5.4) Note!
Check bootloading process and if see trouble shooting if there are errors
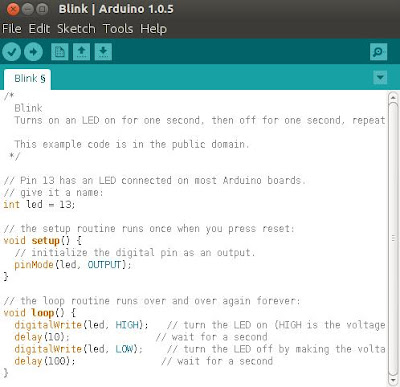
6) New Sketch-> Basic->Digital->Blink
6.1) Compile the program
6.2) Load the program
6.3) Note!
..A LED on pin # 13 must be blinking
Details:
1) ACEduino 2560 from Alexan Store

2) USBasp clone from e-gizmo


4) Connecting ACEduino2560 and USBasp programmer

5) Setting usb driver in udev rules

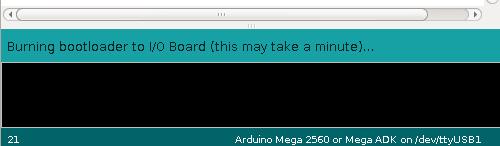
6)Successful loading firmware/bootloader in CLI avrdue

7) Firmware bootloading using arduino 1.5 IDE
(8) Sample blinking program in Arduino Mega2560
Remarks:
1)Trouble:
avrdude: error: could not find USB device "USBasp" with vid=0x16c0 pid=0x5dc
Shooting:
root@localhost# cd /etc/udev/rules.d/
root@localhost# vim 77-coballes.rules
copy and paste this texts:
SUBSYSTEMS=="usb", ATTRS{idVendor}=="16c0", ATTRS{idProduct}=="05dc", GROUP="plugdev", MODE="0667"
root@localhost# chmod 777 77-coballes.rules
root@locahost# chown -R "user"."group" 77-coballes.rules
root@localhost# /etc/init.d/udev restart
Note!
Then try methodology no. 6
2) Trouble:
no avrdude:
Shooting
root@localhost# which avardude
root@localhost# yum install avr*
Conclusion:
Solved : Loading bootloader in Arduino Mega 2560 using USBasp in Linux :)
Tuesday, January 8, 2013
Embedded Proxy Server(ARM9) -mini2440

Introductions:
Hello folks,welcome to the another entry of this MCU blog. It's almost one semester that I did not write on this wall-busy with some tasks outside the cyber-world. Anyway, this new topic well get you interested and I'm so sure about that ;its related to proxy programming and cross compiling the code from an intelx86(32-64 bit) to an ARM9 architecture. I urged myself to ease the pain of debugging the "wcol proxy" program that lasted for 4(four) weeks -awesome stuff.
I was just fascinated of the RFC 1919 which means "proxy" server and RFC 1945 which is HTTP/1.0 protocol,how proxy server came to work ,and I was challenged to port the said intel format source code in a tiny PC, the mini2440 .The source of this program was an inheritance of the wcol proxy development , with careful tweaking and debugging the source code ,it eventually run in an ordinary PC ( with installed Linux OS). You can recompile any proxy server source code available on the net and cross-compile it in a GCC-ARM compiler. But for your comfort I have given a sample proxy program that can be uploaded via our FB Group(Philippines Society of Computer Engineers), and don't your worry this is an open group.
Mini2440 as what you had seen in the main photo, is clocked to 500Mhz and it has 512MB /1GB RAM to functions well as proxy server- its my expectation that at-least there would 5 simultaneous http request before it will have a noticeable processing delay.
Below are the details on how you folks can replicate my work, there I've attached video for a more vivid tutorials.Hope that you will learn things a little bit. By the way ,this was a previous assignment in our MIS class-client & server programming.So get it on...
Below are the details on how you folks can replicate my work, there I've attached video for a more vivid tutorials.Hope that you will learn things a little bit. By the way ,this was a previous assignment in our MIS class-client & server programming.So get it on...
Requirements:
Software:
1) Linux OS(Fedora 14)
2) arm-linux-gcc 4.3.2
3) gcc
4) minicom (serial monitor)
5) telnet
Hardware :
1) PC
2) SD card and adapter
3) mini2440
4) Other PC as another client
Methodology:
Note: you may choose files that are not installed yet.
1)Installations
root@locahost# yum install minicom-s
root@localhost # yum intall telnet*
root@localhost# yum install gcc
root@localhost# yum install *httpd*
2) Downloads
download proxy server code at PSCoE FB group page
https://www.facebook.com/GIIIIRRRLIE#!/groups/256202857800280/
download arm-linux-gcc (4.3.2)
https://code.google.com/p/princess-alist/downloads/detail?name=arm-linux-gcc-4.3.2.tgz&can=2&q=
3) Untar and cross compile
root@localhost# mv arm-linux-gcc-4.3.2.tgz ../
root@localhost# cd ../
root@localhost# tar -zxvf arm-linux-gcc-4.3.3.tgz
root@localhost# cd /usr/local/arm/4.3.2/bin
root@localhost# export PATH:PATH=/usr/local/arm/4.3.2/bin
Please copy "coballesIS238Proxy.c" in the "/usr/local/arm/4.3.2/bin" with this cli command
Note: Try also to check if its bug free-using the basic gcc compiler!
root@localhost@ cp coballesIS238Proxy.c /usr/local/arm/4.3.2/bin
Now cross compile the source code
root@localhost# arm-linux-gcc -mcpu=arm9 -Wall -o coballesIS238Proxy IS238Proxy.c
A green text of file-name(coballesIS238Proxy) will appear as it was compiled already.
4) Copy the cross-compiled program(now in binary file) in the SD card
root@localhost# df -a
root@localhost# mkdir /mnt/SD
root@localhost# mount /dev/sdb(?) /mnt/SD
root@localhost# cp "coballesIS238Proxy" /mnt/SD
5)So you have cross-compiled the code and copied in the SD card .Next, copy the binary file from your sd card to the mini2440
root@localhost telnet IP address of mini2440
[root@FriendlyArm] login
press enter ....see the mini2004 shell!
[root@FriendlyARM]
6) Then insert the SD card in the mini2440
[root@FriendlyArm] df- a
create a directory in your mini2440 shell
[root@FriendlyArm] mkdir /mnt/sdcard
[root@FriendlyARM] mount /dev/mmcblk0 /mnt/sdcard
..then copy the code
[root@FriendlyArm] cd /mnt/sdcard
[root@FriendlyArm/sdcard] cp coballesIS238Proxy ../bin
7) Bingo! run the embedded server now..!
[root@FriendlyArm/bin] ./coballesIS238Proxy -p 350
Details:
0) Downloading "arm-linux-gcc-4.3.2.tgz

1) recompiling proxy source code

2) Checking SD mounting

3) Copying the binary files after SD card mounting

4) executing the cross compiled binary program in a mini2440 board!

5)Error message: " Unreachable host from this network"

6) Error mesage: " temporary problem with the DNS server"

7) embedded proxy server working in mini2440

Summary :
Conclusions:
I cracked the proxy code and embed it in mini2440, so I have now a working embedded proxy server
Subscribe to:
Posts (Atom)